Battery switch on travel trailer function is crucial for managing your RV’s power. Understanding how to use and maintain your battery switch is key to preventing electrical issues and maximizing your camping experience. This guide will walk you through the different types of switches, safe connection procedures, troubleshooting tips, and important safety considerations.
We’ll cover everything from basic functionality and wiring diagrams to advanced troubleshooting and maintenance. Whether you’re a seasoned RVer or a first-timer, this comprehensive guide will equip you with the knowledge to confidently manage your travel trailer’s power system.
Connecting and Disconnecting Batteries
Safe battery handling is crucial for preventing damage to your RV’s electrical system and avoiding personal injury. This section details the proper procedures for connecting and disconnecting your travel trailer’s batteries using a battery switch, emphasizing safety and preventing accidents.Proper grounding and correct polarity are essential for safe battery operation. Connecting batteries incorrectly can lead to sparks, damage to electrical components, and even explosions.
Always double-check your connections before turning on any appliances.
Battery Connection Procedure
Before beginning, ensure the battery switch is in the “OFF” position. This prevents accidental short circuits. Always wear safety glasses to protect your eyes from potential sparks or acid splashes. Locate your battery terminals; they are usually clearly marked with “+” (positive) and “-” (negative) symbols.
- Prepare the Connections: Clean any corrosion from the battery terminals and clamps using a wire brush. This ensures a good electrical connection and prevents voltage drop.
- Connect the Positive (+) Cable: Attach the positive (+) clamp of your battery cable to the positive (+) terminal of the battery. Make sure the clamp is securely fastened.
- Connect the Negative (-) Cable: Attach the negative (-) clamp of your battery cable to the negative (-) terminal of the battery. Again, ensure a secure connection.
- Grounding: If your battery setup includes a ground wire, connect it securely to a clean, grounded metal surface on your trailer chassis. This helps prevent stray voltage and improves the overall electrical system performance.
- Switch to “ON”: Once all connections are secure, turn the battery switch to the “ON” position. Check your trailer’s lights and appliances to ensure power is functioning correctly.
Battery Disconnection Procedure
Disconnecting batteries is equally important for safety and maintenance. Following the correct procedure prevents accidental short circuits and damage to electrical components.
- Switch to “OFF”: Turn the battery switch to the “OFF” position. This cuts power to the batteries and prevents accidental short circuits during disconnection.
- Disconnect the Negative (-) Cable: Always disconnect the negative (-) cable first. This minimizes the risk of accidental short circuits during the disconnection process.
- Disconnect the Positive (+) Cable: Next, disconnect the positive (+) cable from the battery terminal.
- Ground Wire Disconnection (If Applicable): Disconnect the ground wire if one is present.
Preventing Accidental Short Circuits
Accidental short circuits can be dangerous and damaging. Here are some crucial preventative measures:
- Keep Cables Organized: Ensure battery cables are neatly organized and secured to prevent them from touching each other or metal parts of the trailer.
- Inspect Cables Regularly: Periodically inspect battery cables for any signs of damage, wear, or corrosion. Replace damaged cables immediately.
- Use Insulated Clamps: Make sure you use battery clamps with good insulation to prevent accidental short circuits.
- Avoid Contact with Metal: While connecting or disconnecting batteries, avoid contact between the battery terminals and any metal objects.
Battery Switch Flowchart
The following describes a flowchart illustrating the procedure for switching between batteries (assuming a dual-battery setup with a selector switch). Imagine a diagram with boxes and arrows.* Start: The process begins with the battery switch in the “OFF” position.
Select Battery
The user selects the desired battery (Battery 1 or Battery 2) using the selector switch.
Switch to “ON”
So, you’re an audiophile who loves to travel? Awesome! First things first, check out this guide on setting up your audiophile travel setup – it’s crucial for maintaining your sonic bliss on the go. Then, before you even think about packing those headphones, make sure you’ve got your travel insurance sorted. Getting Aon travel insurance provides peace of mind, knowing your gear (and yourself!) are covered in case of any mishaps.
Happy travels!
The switch is turned to the “ON” position.
Check Power
Verify that the selected battery is supplying power to the trailer’s systems.
Switch to “OFF” (to change)
To switch to the other battery, turn the switch to the “OFF” position first.
Select Other Battery
Select the alternative battery using the selector switch.
Switch to “ON”
Turn the switch to the “ON” position.
Check Power
Verify that the newly selected battery is powering the trailer.
End
The process concludes with power supplied by the selected battery.
Troubleshooting Common Battery Switch Issues

So, your travel trailer’s battery switch is giving you trouble? Don’t worry, it’s a fairly common problem. This section will guide you through identifying and fixing some of the most frequent issues. We’ll cover everything from no power at all to blown fuses, helping you get back to enjoying your adventures.Troubleshooting a malfunctioning battery switch involves a systematic approach.
By carefully checking each component, you can pinpoint the problem and get your power back online quickly and safely. Remember to always disconnect the negative battery terminal before starting any electrical work. Safety first!
Identifying Common Problems
Common problems with travel trailer battery switches include a complete lack of power, blown fuses, tripped circuit breakers, or issues with the switch itself (like a faulty switch mechanism). Sometimes, the problem isn’t even with the switch, but rather a loose connection somewhere in the wiring. These problems can manifest in different ways, depending on the specific setup of your trailer.
For instance, you might find that only certain appliances are working, while others are completely dead.
Troubleshooting Steps for a Non-Functional Battery Switch, Battery switch on travel trailer function
First, visually inspect the switch itself. Look for any obvious signs of damage, such as burnt wires or a visibly damaged switch mechanism. Then, check the connections to the switch, ensuring they are tight and secure. Loose connections are a frequent culprit. Next, move on to checking the fuses and circuit breakers.
Checking Fuses and Circuit Breakers
Fuses and circuit breakers are designed to protect your electrical system from overloads. A blown fuse will have a broken filament visible inside the glass casing. A tripped circuit breaker will be in the “off” position. Replacing a blown fuse requires a fuse of the same amperage rating. Resetting a tripped circuit breaker involves simply switching it back to the “on” position.
However, if a fuse blows repeatedly or a circuit breaker trips frequently, it suggests an underlying problem in the electrical system that needs attention before simply replacing the fuse or resetting the breaker. This could be a short circuit somewhere in your trailer’s wiring.
Troubleshooting Guide
- No Power: Check the battery switch position, inspect all connections for tightness, check all fuses and circuit breakers.
- Partial Power: Isolate the affected appliances. Check the fuses and circuit breakers associated with those appliances. Look for loose or damaged wiring in the circuits related to the non-functioning appliances.
- Blown Fuses/Tripped Breakers: Replace the fuse with one of the same amperage rating (never use a higher amperage fuse). Reset the circuit breaker. If the fuse blows or the breaker trips again immediately, there is a short circuit or an overloaded circuit. Investigate the wiring and appliances connected to that circuit.
- Switch Malfunction: If you’ve checked everything else and still have no power, the switch itself may be faulty. Consider replacing the switch. This often requires some electrical knowledge or professional assistance.
Remember to consult your travel trailer’s wiring diagram if you’re unsure about specific fuse or breaker locations and their associated circuits. If you’re not comfortable working with electricity, it’s always best to consult a qualified RV technician.
So, you’re an audiophile who also loves to travel? Awesome! Make sure you check out this guide on setting up your audiophile travel setup before you go. It’s crucial to protect your gear, right? And while you’re planning, don’t forget travel insurance! Look into Aon travel insurance for comprehensive coverage – peace of mind is priceless, especially when you’re carrying expensive equipment.
Integrating the Battery Switch into the Electrical System
Getting your battery switch correctly integrated into your travel trailer’s electrical system is crucial for safe and reliable power management. This involves understanding how the switch interacts with other components like your converter and inverter, and ensuring proper wiring for optimal performance. A correctly installed battery switch protects your batteries, prevents accidental drain, and allows you to easily switch between battery power and shore power.Proper wiring is essential to avoid short circuits and potential damage to your electrical system.
This section will guide you through the process of integrating the battery switch, providing a clear understanding of the connections and the tools needed for the job. Remember to always disconnect power before working with any electrical components.
Battery Switch Interaction with Other Electrical Components
The battery switch acts as a central control point for your trailer’s 12-volt DC system. It’s positioned between your batteries and the rest of your electrical components. Your converter, which transforms 120-volt AC shore power to 12-volt DC, typically draws power from your batteries. The inverter, which converts 12-volt DC to 120-volt AC, does the opposite. The battery switch allows you to disconnect the batteries from these components when not in use, preventing parasitic drain.
For example, if you’re not using your trailer for an extended period, you can switch off the batteries to prevent them from discharging completely. This extends their lifespan and ensures you’ll have power when you need it.
Wiring a Battery Switch into a Travel Trailer’s Electrical System
Wiring the battery switch involves connecting the positive (+) and negative (-) cables from your batteries to the switch, and then running further cables from the switch to the rest of your 12-volt DC system. The switch typically has several positions: “Off,” “Battery,” “Both,” and sometimes “Shore.” “Off” completely disconnects the batteries. “Battery” connects only the house batteries.
“Both” connects both the house and the starting batteries (if applicable). “Shore” typically bypasses the batteries and uses shore power directly. Always follow the specific instructions provided with your battery switch model. Incorrect wiring can lead to serious problems. It’s best to consult a qualified electrician if you’re unsure about any aspect of the installation.
Necessary Tools and Materials for Battery Switch Installation
Before you begin, gather the following tools and materials:
It’s crucial to have the correct tools and materials to ensure a safe and efficient installation. Improper tools can damage components or lead to unsafe conditions.
| Item | Description |
| Battery Switch | The correct amperage rating for your system. |
| Battery Cables | Heavy-gauge cables appropriate for your battery’s amperage rating, with appropriate connectors. |
| Wire Strippers/Cutters | For preparing the ends of the cables. |
| Crimping Tool | To securely attach connectors to the cables. |
| Electrical Tape | For insulating connections. |
| Wrench/Socket Set | For tightening battery terminals. |
| Multimeter | To test connections and ensure proper voltage. |
| Safety Glasses | To protect your eyes. |
| Work Gloves | For protection. |
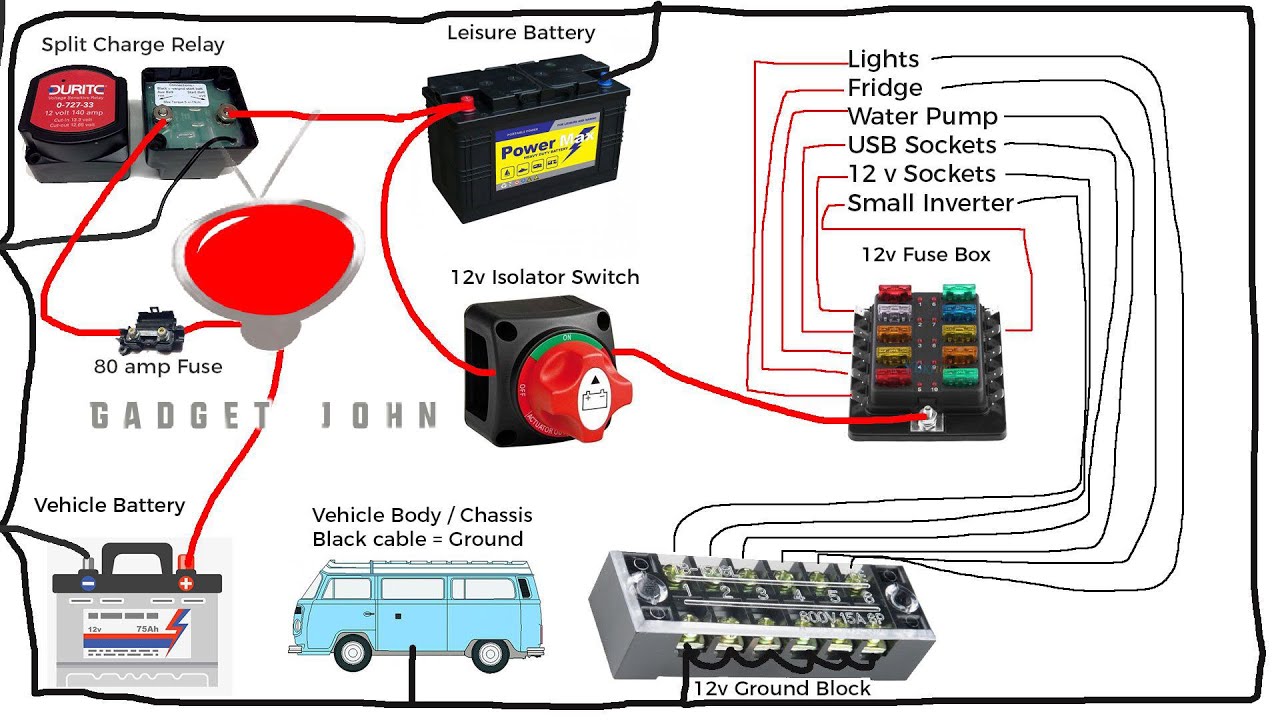
Visual Representation of a Properly Wired Battery Switch System
The following diagram illustrates a typical setup. Remember that your specific setup might vary slightly depending on your trailer’s wiring and the type of battery switch you’re using.
| Component | Connection Point on Switch | Description | Image Description |
|---|---|---|---|
| Positive (+) Battery Terminal (House Battery) | Input (+) Terminal | Connects the positive terminal of your house battery to the switch’s input. | A thick red cable connected to the battery’s positive terminal, running to a labeled input terminal on the switch. |
| Negative (-) Battery Terminal (House Battery) | Input (-) Terminal | Connects the negative terminal of your house battery to the switch’s input. Note that this connection is often made directly to the chassis. | A thick black cable connected to the battery’s negative terminal, often running directly to a chassis ground point. |
| Converter/Inverter (+) | Output (+) Terminal | Connects the switch’s output to the positive terminal of your converter/inverter. | A red cable running from the switch’s output to the positive input of the converter/inverter. |
| Converter/Inverter (-) | Output (-) Terminal (or Chassis Ground) | Connects the switch’s output to the negative terminal of your converter/inverter (or a chassis ground point). | A black cable running from the switch’s output to the negative input of the converter/inverter, or a chassis ground point. |
Battery Switch Selection and Considerations
Choosing the right battery switch for your travel trailer is crucial for safe and reliable power management. A poorly chosen switch can lead to insufficient power, overheating, or even dangerous electrical failures. This section will guide you through the process of selecting the appropriate battery switch for your specific needs.Selecting the correct battery switch involves careful consideration of several key factors.
These factors ensure the switch can handle the electrical demands of your trailer and provide years of trouble-free operation. Ignoring these factors can lead to premature failure or even safety hazards.
Battery Switch Brands and Models
Several reputable brands manufacture battery switches suitable for travel trailers. Popular options include Blue Sea Systems, Perko, and Xantrex. Each brand offers a range of models with varying amperage ratings, switch types (e.g., single, dual, multi-bank), and features. For example, Blue Sea Systems offers a wide selection of switches known for their durability and ease of use, while Perko is recognized for its marine-grade switches designed to withstand harsh environments.
Xantrex focuses on more advanced power management solutions often incorporating features beyond basic switching. Choosing a brand with a strong reputation for quality and reliability is paramount.
Factors to Consider When Choosing a Battery Switch
The amperage rating is the most critical factor. This rating determines the maximum current the switch can safely handle. Choose a switch with an amperage rating significantly higher than the expected maximum current draw of your trailer’s electrical system. For instance, if your trailer’s appliances draw a combined maximum of 100 amps, a 150-amp switch would provide a safety margin.
The type of switch (single, dual, or multi-bank) depends on the number of batteries you’re using. A single battery switch is suitable for a single battery setup, while a dual battery switch is necessary for two batteries (common in travel trailers). Multi-bank switches handle three or more batteries, allowing for complex power configurations. Finally, consider features like illuminated switches for easier visibility at night, or switches with built-in circuit breakers for added safety.
Recommendations Based on Travel Trailer Size and Power Demands
For smaller travel trailers with modest power demands (e.g., limited lighting, small refrigerator), a 75-amp dual battery switch might suffice. Mid-sized trailers with more appliances (larger refrigerator, air conditioner, microwave) may require a 100-amp or even a 150-amp dual or multi-bank switch. Larger trailers with substantial power requirements (multiple air conditioners, inverters, etc.) often necessitate a 200-amp or higher-rated multi-bank switch.
Always calculate your total amperage draw to determine the appropriate switch capacity. Remember to add a safety margin of at least 25% to account for surges and unexpected loads.
Comparison of Popular Battery Switch Models
| Brand | Model | Amperage Rating | Type |
|---|---|---|---|
| Blue Sea Systems | 7625 | 150 Amps | Dual Battery |
| Perko | 0543DP12 | 100 Amps | Dual Battery |
| Xantrex | Freedom RC-100 | 100 Amps | Multi-Bank (Configurable) |
| Blue Sea Systems | 007626 | 200 Amps | Multi-Bank |
Mastering your travel trailer’s battery switch is essential for a smooth and safe camping adventure. By understanding its function, performing regular maintenance, and knowing how to troubleshoot common problems, you’ll ensure reliable power and avoid frustrating breakdowns. Remember, safety first – always disconnect batteries before performing any maintenance or repairs.
Quick FAQs: Battery Switch On Travel Trailer Function
What happens if I leave my battery switch in the “off” position?
Leaving the switch in the “off” position completely disconnects both batteries from the trailer’s electrical system, preventing any power drain.
Can I use a battery switch with lithium batteries?
While some battery switches are compatible, it’s crucial to check the switch’s amperage rating and ensure it’s designed for lithium batteries. Consult your battery and switch manuals.
How often should I clean my battery terminals?
Clean your battery terminals at least twice a year, or more frequently if you notice corrosion buildup. This helps ensure a good connection and prevents power loss.
What size battery switch do I need?
The appropriate size depends on the amperage draw of your appliances. Choose a switch with an amperage rating that exceeds the maximum current your system will demand.
